

Preparations
- These drills should be practiced with a mirror, until enough muscle memory or "feel" is established.
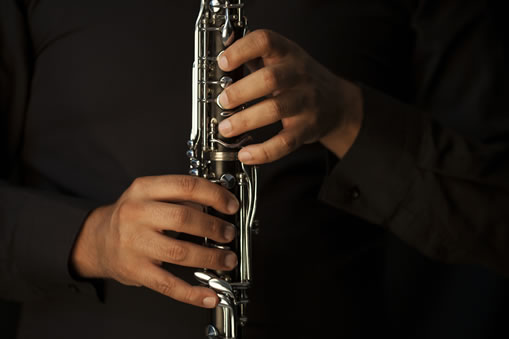
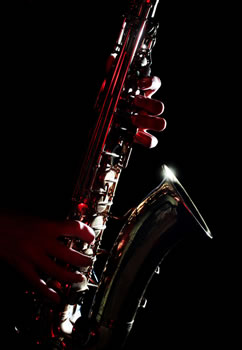
- This routine is best learned by first using the mouthpiece-neck combination for saxophone, or mouthpiece-barrel combination for clarinet, before attempting them with the complete instrument. When you accomplish the entire routine, add the combination to the body of the instrument.
Technique
There are four steps to learning the basic embouchure, they are:
- Set
- Place
- Blow
- Jaw
1. Set
This is the simple motion of bringing the lower lip over the lower teeth, with minimal or no extraneous movement of other facial muscles. Using unnecessary muscles shows itself in the form of dimples, lines, wrinkles, widening of the mouth, and bunching of the chin. These are all signs of unnecessary tension. By doing this step correctly you are creating the foundation for the next step.
Caution: Pushing the lower jaw forward into the lip can look very much like you are bringing the lip over the teeth, but by doing so, you are pushing your jaw out of it's natural plane which creates tension in the throat and puts the pressure point too far down the reed.
2. Place
Bring the mouthpiece-neck or barrel combination to your mouth and place the reed on the lip with no change of Step 1: Set.
Practice this until you can do this 3 times in a row without change. The most common errors in this step are:
- The lip coming off the teeth, reaching for the reed.
- The head coming down on the mouthpiece.
- Pushing the lip further into the mouth.
3. Blow
Blow air into the mouthpiece. Air sound only. You are not trying to get a sound. The pitch of the air should be low, and feel as if you are blowing warm air into the mouthpiece. Notice in the mirror if there is any change of facial expression, or deviation from steps one or two.
This should be done 3 times without change. If you notice any change you should go back to Step 1 and go through the steps.Note:
These steps are to be done in exact sequence. Use the mirror to ascertain if you are maintaining the SET position as step 2, 3, and 4 are added.When actually playing Steps 3 and 4 are combined into one step. If you notice any change when doing the steps you should return to Step 1.
This is a training routine!
4. Pressure
While blowing add pressure of the lower jaw to the reed until a sound is produced. This is done with the use of the chewing muscles at the back of the jaw. It is the same motion as chewing or saying the letter "X". If the correct muscles are used there will be no change of your facial expression, as defined in Step 1. With some practice and careful attention you will begin to tell the difference between jaw pressure and lip pressure. Lip pressure makes the the sound "darker" and response slower.
Note:
These steps are to be done in exact sequence. Use the mirror to ascertain if you are maintaining the SET position as step 2, 3, and 4 are added.
When actually playing, Steps 3 and 4 are combined into one step. If you notice any change when doing the steps you should return to Step 1.
This is a training routine!
 Objective
1. Helps reduce tension of throat, tongue and facial muscles.
2. Promotes correct position and use of the tongue.
3. Improves awareness of jaw pressure.
Background:
Technique
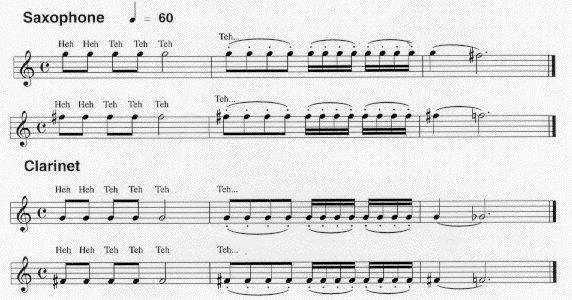 1. The notes in measure 1 are to be played "forte". The objective is to attack the notes as crisply as possible. All notes should have the same pitch and volume! The most common problems in measure 1 are:
- Note: Teh... means continue using the syllable teh for the remaining notes.
- The notes are not crisply attacked.
- The volume or pitch changes when adding the "t".
- The pitch and volume changes drastically on the half note.
- The half note is not held it's full value.
2. In the beginning it may be necessary to play more than the prescribed amount of breath attacks and tongued notes in measure 1. When you are successful playing measure 1, proceed to measure 2.
3. The notes in measure 2 are to be played without separation (legato tonguing). However the beginning of each note should be very clear and definite. The common problems in measure 2 are:
- The beginnings of the notes are not definite sounding more like "leh" than "teh"
- In trying to make them definite one separates the notes and plays them staccato.
4. Ideally, this exercise is to be continued to the lowest possible note. In the beginning, however, the lower notes may prove to be too difficult. One should take this to where he or she is comfortable and gradually increase the range downwards and upwards eventually reaching from the lowest possible note to the highest possible note.If you find any of the above instructions unclear be sure you clearly understand the meaning of the words used. If you are not sure of the meaning of a word used look up the meaning of the word in a dictionary.
5. If this exercise is practiced without the awareness of pitch, rhythm, and volume, you are wasting your time!!!
If you find any of the above instructions unclear be sure you clearly understand the meaning of the words used. If you are not sure of the meaning of a word used look up the meaning of the word in a dictionary.
Objectives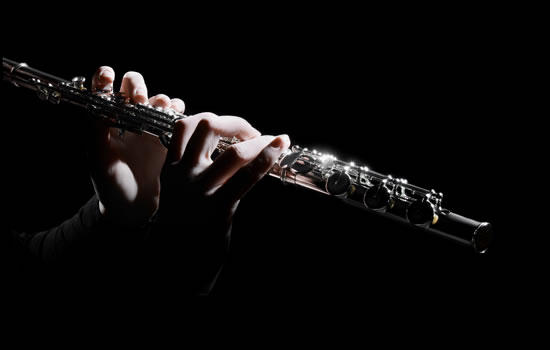
1. Helps set position of the flute.
2. Helps set position of the lower jaw
3. Promotes correct position and use of the tongue
Background:
Note:
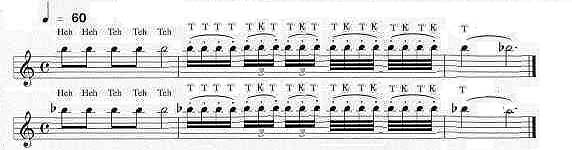
T = Teh
K = Keh
Double ("Teh-Keh") tongue and triple ("Teh-Keh-Teh") tongue where necessary.
Technique
1. The notes in measure 1 are to be played "forte". The objective is to attack the notes as crisply as possible. All notes should have the same pitch and volume! The most common problems in measure 1 are:
- The notes are not crisply attacked.
- The volume or pitch changes when adding the "t".
- The pitch and volume changes drastically on the half note.
- The half note is not held it's full value.
2. In the beginning it may be necessary to play more than the prescribed amount of breath attacks and tongued notes in measure 1. When you are successful playing measure 1, proceed to measure 2.
3. The notes in measure 2 are to be played without separation (legato tonguing). However the beginning of each note should be very clear and definite. The common problems in measure 2 are:
- The beginnings of the notes are not definite sounding more like "leh" than "teh"
- In trying to make them definite one separates the notes and plays them staccato.
4. Ideally, this exercise is to be continued to the lowest possible note. In the beginning, however, the lower notes may prove to be too difficult. One should take this to where he or she is comfortable and gradually increase the range downwards and upwards eventually reaching from the lowest C to the highest C.
5. If this exercise is practiced without the awareness of pitch, rhythm, and volume, you are wasting your time!!!
One of the most fundamental problems wind players have is incorrect head position. This is terribly important because your head position can greatly affect the quality and quantity of air production.
Your head should be held in it's natural position which, upon observation, would be parallel to the floor. The three most common faults are:
1. The head bending down and leaning on the mouthpiece.
The most common, on all instruments, of these positions is having the head bent down towards the chest. I find this problem to be the most severe in Soprano Saxophone players and Flutists. Performers of the Alto, Tenor, and Baritone saxophones can correct this by adjusting the neckstrap so that the instrument mouthpiece naturally comes to the players mouth. If you find that you have to move your head for the natural, parallel, position to reach the mouthpiece you should adjust the neckstrap to allow your head to remain in the proper natural position. Daniel Bonade used to correct this problem on his clarinet students by raising his students music stands high enough so they were forced to have the head in a higher position to see the music. One should be careful not to put the stand too high where the head is tilting back and up as in position 3. Both Clarinetists and saxophonists should feel that the top teeth are receiving the pressure from the bottom teeth rather than initiating the pressure from the top teeth.
2. The head being pulled back shortening the neck.
The player should feel his head being moved slightly forward without moving up or down and being careful not to move the shoulders. The neck should feel slightly long.
3. The head tilting back and up.
All of these changes in head position constrict the wind pipe and vocal chords. As an experiment, try talking with your head in extreme positions. Try to speak with your head all the way down to your chest and and all the way to your back. You will find that the quality of your speaking voice decreases greatly at these extremes. Now try speaking while you gradually move your head to each of these extremes. You should notice that as you move closer and closer to the extreme the quality of your voice suffers. Anything that causes the quality of your voice to decrease will equally affect your playing of a wind instrument.
If there's anything you don't clearly understand here, don't guess! Contact Mr. Morosco for further clarification.
The syllables chosen for the exercise have been very carefully thought out, and must be duplicated very precisely to obtain the maximum benefit from this exercise. The vowel sound in "HEH" should rhyme with the beginning syllable "Hea" of the name "Heather" in english. This promotes the optimum standard position for the tongue while playing by creating the most powerful flow of air in the oral cavity. You will notice when saying this syllable the tongue is slightly raised in the mouth and lightly touching the upper molars.
The syllable "TEH" should rhyme with beginner of the word "tether" in english. This maintains the optimum tongue position when adding the tongue for articulation. One should practice saying these two syllables before playing them on an instrument. It has been my experience that most people change the sound of the vowel when adding the "T".